How Skilled Technicians Diagnose AC Problems A Practical Guide for Homeowners
Introduction
Air conditioning problems can be frustrating and costly if handled incorrectly. This article explains how experienced HVAC technicians diagnose AC issues so homeowners understand what to expect and why professional diagnosis matters. Good diagnosis blends measurable testing, visual inspection, and years of hands-on experience. Technicians use standardized procedures to identify root causes not just symptoms which reduces repeat repairs and prevents unsafe conditions like refrigerant leaks or electrical hazards. Throughout this guide you’ll find plain-language explanations of common symptoms, the diagnostic tools and techniques used, the step-by-step diagnostic workflow, and guidance on when a trained technician is required. The content follows principles of Experience, Expertise, Authority, and Trust (EEAT): it emphasizes licensed technicians, evidence-based tests, safety-first practices, and decisions rooted in industry-standard methods. Whether you’re a homeowner trying to understand a service report or preparing to call a pro, this article will make technician reasoning transparent so you can make informed choices.
Common symptoms and what they usually indicate
When homeowners call for service they describe symptoms: weak airflow, warm air, strange noises, frequent cycling, or visible leaks. Technicians translate these symptoms into likely causes by combining symptom patterns with system history and simple measurements. For example, weak airflow often points to a clogged filter, blocked duct, failing blower motor, or collapsed fan belt each requiring a different fix. Warm air can signal low refrigerant charge, compressor failure, stuck expansion device, or dirty evaporator coils. Rattles and grinding noises suggest mechanical wear; hissing can imply a refrigerant leak. Short-cycling (turning on and off rapidly) is often an electrical or control problem such as a faulty thermostat, capacitor issues, or improper refrigerant charge. Technicians prioritize safety and start with non-invasive checks (filter, thermostat settings, breaker) then move to diagnostic tests. Accurate symptom interpretation saves time and cost because it narrows tests and prevents unnecessary part replacement. Understanding these symptom-to-cause relationships helps homeowners ask better questions and verify that the technician performed appropriate diagnostics.
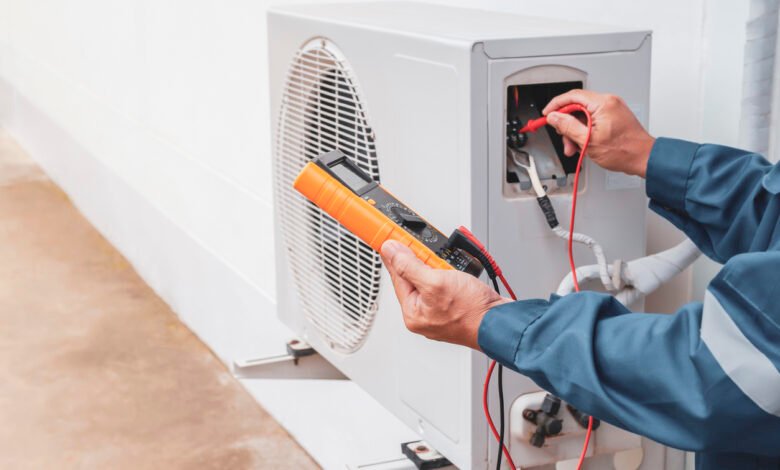
Tools and methods technicians use to find the root cause
Professional technicians rely on a predictable toolkit and measurement methods to diagnose reliably. Common tools include a digital multimeter for electrical checks, manifold gauge sets to read refrigerant pressures, temperature probes for delta-T (temperature difference) checks across the evaporator, and an airflow meter or vane anemometer for blower performance. Leak detection is performed with electronic leak detectors, UV dye, or soap tests in some cases. Infrared thermometers help spot blocked coils or duct leaks by scanning surface temperatures. More experienced techs may use combustion analyzers (for furnaces or heat-pump hybrids) or noid lights and wiring diagrams for control-system troubleshooting. Method-wise, technicians follow a logical progression: confirm symptoms, perform safety checks (power off, lockout), measure static conditions (voltages, pressures, temperatures), run dynamic tests under load, and compare results to manufacturer specifications. They document findings and only then recommend repairs. This combination of calibrated tools and methodical steps not guesswork is what distinguishes a true diagnosis from a trial-and-error repair.
Step-by-step diagnostic process technicians follow on-site
A competent technician follows a consistent on-site workflow that prioritizes safety, accuracy, and minimal disruption. First, they confirm the customer’s reported problem and inspect basic settings: thermostat mode and setpoint, circuit breakers, and visible air filters. Next comes a visual inspection of major components (outdoor condenser, indoor evaporator, duct connections, wiring) to spot obvious issues like burned wires, oil stains, or damaged fins. The technician then powers the unit and performs baseline measurements line voltages, compressor amps, suction and discharge pressures, and temperature splits across the evaporator. If a refrigerant issue is suspected, pressure readings are taken and compared to expected values for ambient conditions. For airflow concerns, blower speed and duct impedances are checked. Advanced diagnostics may include motor winding resistance, capacitor microfarad testing, or control board signal traces. Findings are compared against manufacturer specifications and safety limits. Only after isolating the failing subsystem (electrical, refrigerant, mechanical, or controls) does the technician recommend targeted repairs, provide a transparent estimate, and explain the evidence behind the recommendation.
When to call a professional and what quick checks you can do first
Homeowners can perform a few safe, non-technical checks before calling for service: replace or clean the air filter, ensure the thermostat has fresh batteries and correct settings, and check the breaker or disconnect. Also clear debris around the outdoor unit and ensure registers are open. However, if you encounter refrigerant-scented leaks, tripped breakers that immediately reset, burning smells, water pooling, or loss of cooling after simple fixes, it’s time to call a licensed HVAC technician. Refrigerant handling and electrical diagnostics carry hazards and often require certification and calibrated tools. Licensed pros also ensure warranty compliance and use manufacturer-approved procedures, which reduces the risk of future failures. For older systems, professionals can evaluate lifecycle risks and advise on cost-effective replacements versus repairs. Calling a reputable, insured technician with documented credentials and positive reviews protects you and ensures the diagnosis is thorough and defensible.
Conclusion
Quality AC diagnosis is both art and science: it blends experienced judgment with objective measurements and documented standards. Skilled technicians follow methodical workflows, use calibrated tools, and adhere to safety and regulatory requirements so the underlying cause not just the symptom is fixed. As a homeowner, understanding the diagnostic process helps you choose the right technician, evaluate service reports, and avoid unnecessary repairs. Prioritize trained, licensed professionals who provide clear evidence of their findings and explain recommended actions. This approach saves money, improves HVAC reliability, and keeps your home safe and comfortable.
FAQs
Q: How long does a proper diagnostic visit usually take?
A: Most thorough diagnostics take between 30 minutes and 90 minutes depending on the complexity and whether indoor and outdoor measurements are needed.
Q: Will a technician always need to add refrigerant to fix cooling problems?
A: No. Refrigerant should only be added if a leak is found and repaired. Low refrigerant is a symptom, not a permanent fix.
Q: Can a homeowner trust a DIY multimeter check?
A: Basic voltage checks are possible for DIYers, but interpreting results and safely working on live electrical systems is best left to trained technicians.
Q: Should diagnostic findings be written down?
A: Yes request a written service report showing measurements and conclusions so you have a record for warranties and future service.
Q: How can I verify a technician’s qualifications?
A: Ask for license numbers, EPA refrigerant handling certification, insurance proof, and references or reviews from previous customers.